![[안드로이드/Radius] 레이아웃 둥글게 만들기](https://img1.daumcdn.net/thumb/R750x0/?scode=mtistory2&fname=https%3A%2F%2Fblog.kakaocdn.net%2Fdna%2FdXUXA2%2FbtsFA9CNENW%2FAAAAAAAAAAAAAAAAAAAAANL17Z-gal6ADHSdhnxSkrqvrYGL-bXOPcA8sDVh7Twq%2Fimg.png%3Fcredential%3DyqXZFxpELC7KVnFOS48ylbz2pIh7yKj8%26expires%3D1764514799%26allow_ip%3D%26allow_referer%3D%26signature%3D9UIY6Pq9sKxpQaJxcecXu6e7hb4%253D)

안드로이드 스튜디오에서 디자인을 할 때 내가 사용할 이미지 또는 TextView등 원하는 모양으로 바꾸고 싶으실 겁니다.
그래서 간단하게 예제를 들고 왔습니다.
필요하실때 수정해서 쓰세요!.
Radius 만들기
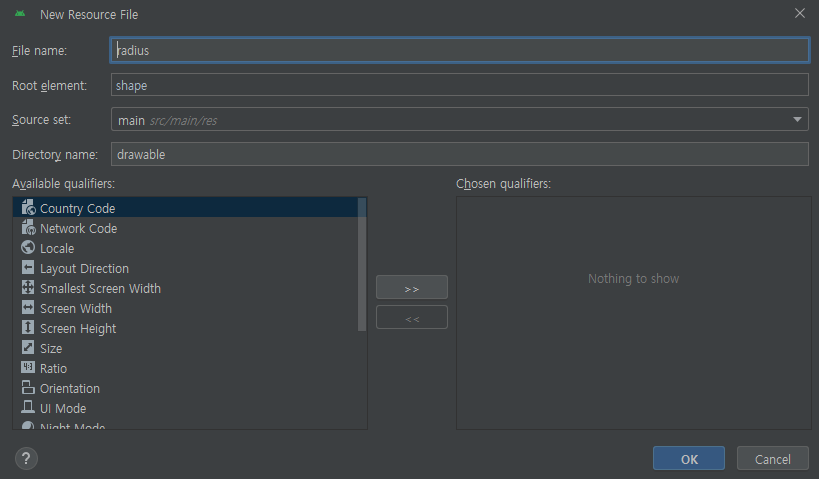
res -> drawable 우클릭 -> New -> Drawable Resource File 클릭
위 과정을 하시면 밑에 창이 뜰 겁니다. 그럼 밑에 사항만 변경해 줍니다.
File name: 원하는 이름
Root element: shape
이렇게 설정하고 OK 클릭

OK 클릭했으면 아래 코드 복사 붙여 넣기
<?xml version="1.0" encoding="utf-8"?>
<shape
    xmlns:android="http://schemas.android.com/apk/res/android"
    android:shape="rectangle" android:padding = "10dp">
    <solid
        android:color="#ffffff">
    </solid>
    <corners
        android:bottomLeftRadius="45dp"
        android:bottomRightRadius="45dp"
        android:topLeftRadius="45dp"
        android:topRightRadius="45dp">
    </corners>
    <stroke
        android:width="2dp"
        android:color="#BDBDBD">
    </stroke>
</shape>
위 코드 설명을 볼려면? [ 밑에 더보기+ 클릭 ]
<shape> = 도형 드로어블로 이 요소는 무조건 루트 요소여야 합니다.
android:padding = 뷰 요소에 적용할 패딩으로, 도형이 아닌 뷰 콘텐츠의 위치가 패딩이 됩니다.
android:shape = 도형의 유형(모양)을 변경할 수 있습니다.
"rectangle" = 직사각형
<solid> = 도형을 채울 단색 입니다. 이 안에다가 색깔을 지정합니다
android:color = #ffffff
<corners> = 도형의 각 모서리를 둥글게 해줍니다. shape가 rectangle인 경우에만 사용 가능합니다.
android:bottomLeftRadius = 왼쪽 하단 모서리 조절
android:bottomRightRadius = 오른쪽 하단 모서리 조절
android:topLeftRadius = 왼쪽 상단 모서리 조절
android:topRightRadius = 오른쪽 상단 모서리 조절
<stroke> = 도형의 테두리에 대한 설정 값을 변경할 수 있습니다.
android:width = 테두리에 대한 선의 두께, 크기 값을 정할 수 있습니다.
android:color = #BDBDBD
그다음 activity_main.xml에 아래 코드 복사 붙여 넣기
<?xml version="1.0" encoding="utf-8"?>
<androidx.constraintlayout.widget.ConstraintLayout
    xmlns:android="http://schemas.android.com/apk/res/android"
    xmlns:app="http://schemas.android.com/apk/res-auto"
    xmlns:tools="http://schemas.android.com/tools"
    android:layout_width="match_parent"
    android:layout_height="match_parent"
    tools:context=".MainActivity">


    <TextView
        android:layout_width="wrap_content"
        android:layout_height="wrap_content"
        android:background="@drawable/radius"
        android:padding="10dp"
        android:text="Radius Sample"
        android:textSize="20sp"
        app:layout_constraintBottom_toBottomOf="parent"
        app:layout_constraintEnd_toEndOf="parent"
        app:layout_constraintStart_toStartOf="parent"
        app:layout_constraintTop_toTopOf="parent" />

</androidx.constraintlayout.widget.ConstraintLayout>
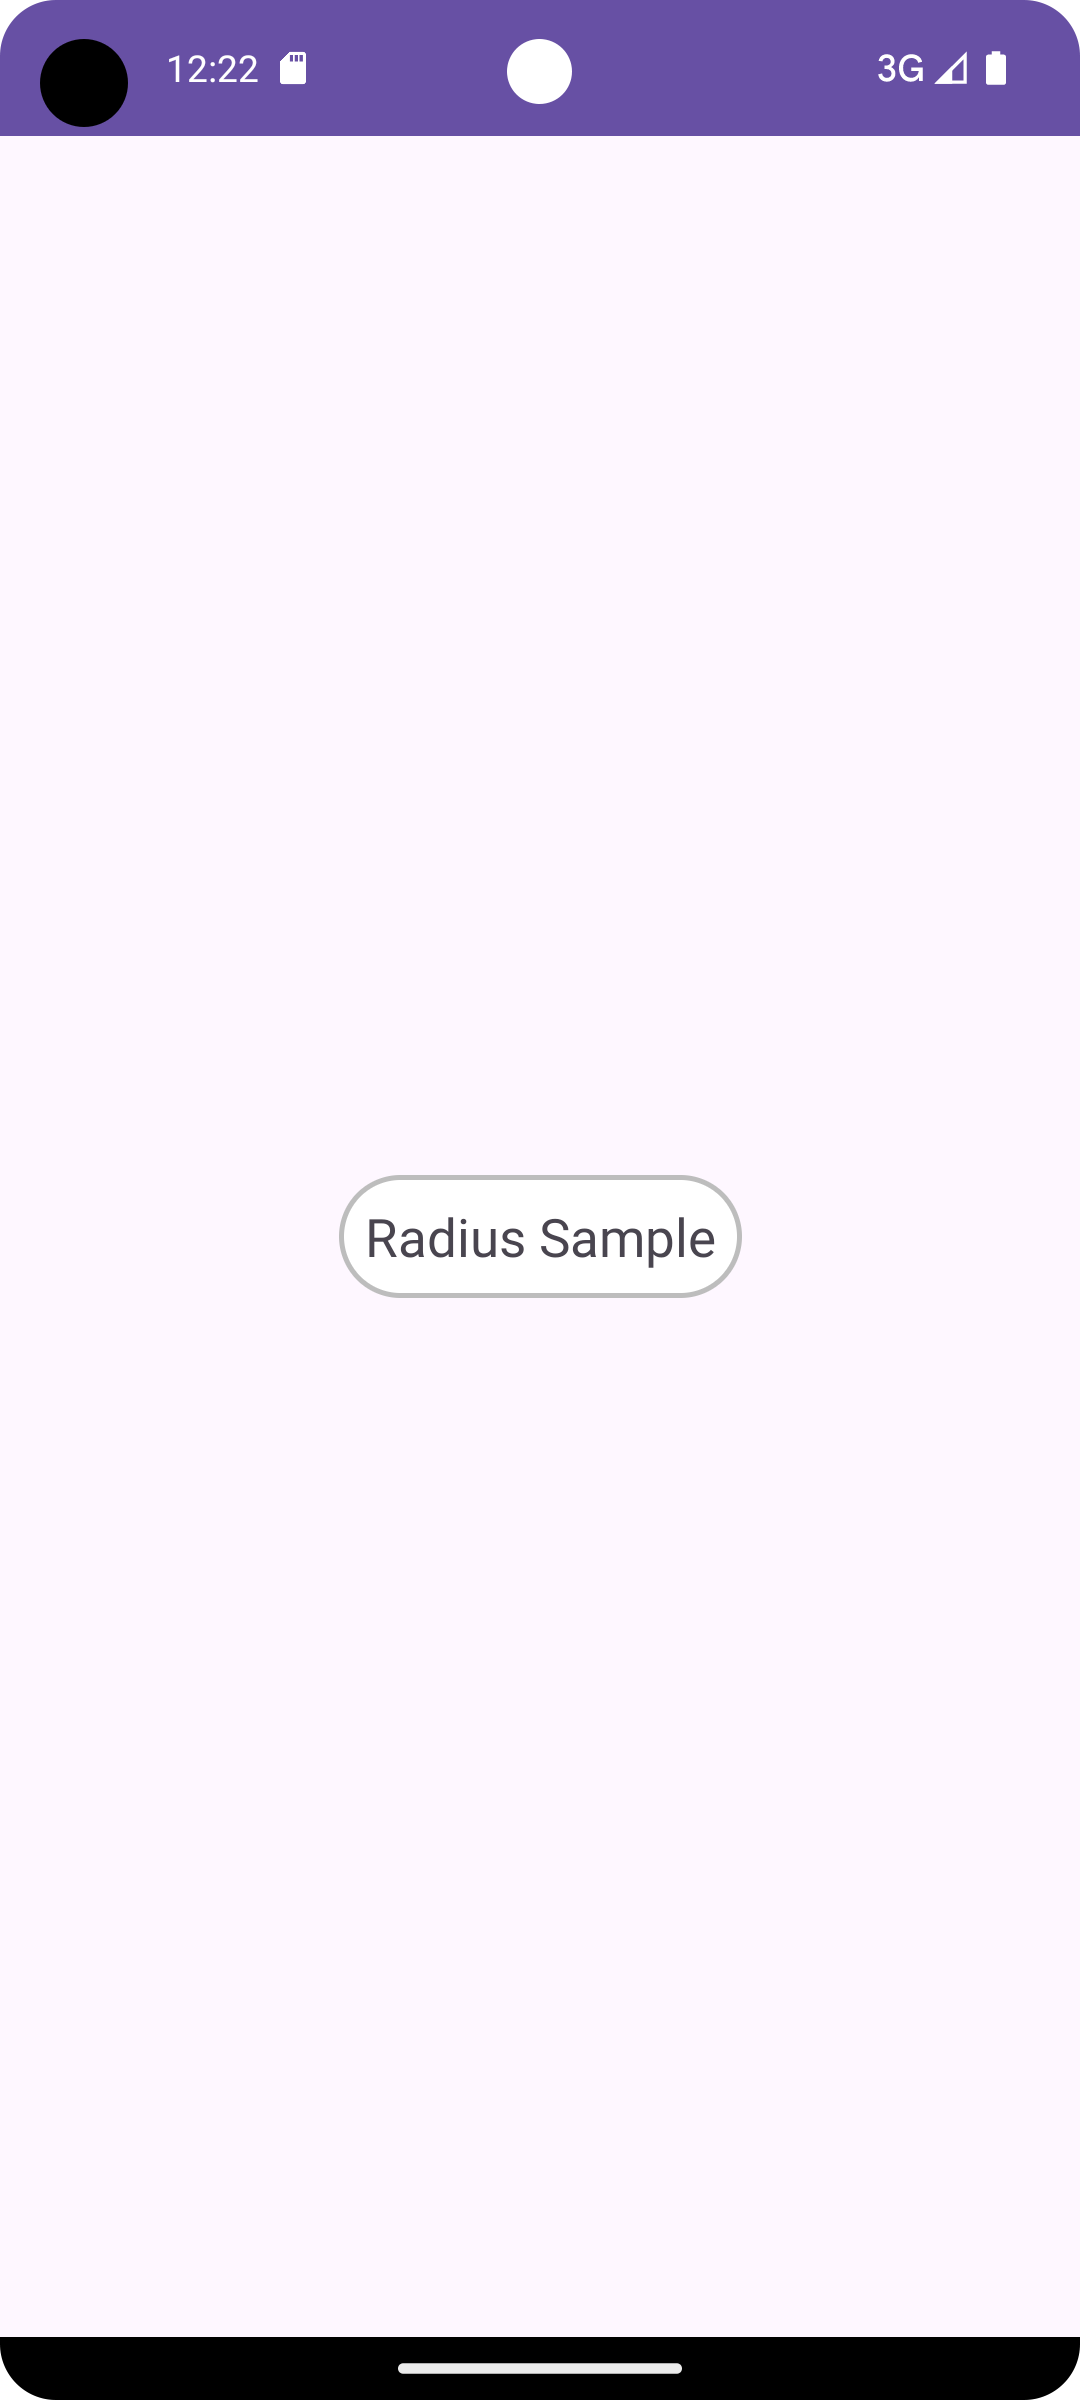
background를 통해 만들어둔 radius를 불러오고
padding으로 텍스트 크기에 맞게 크기를 늘려줬습니다.
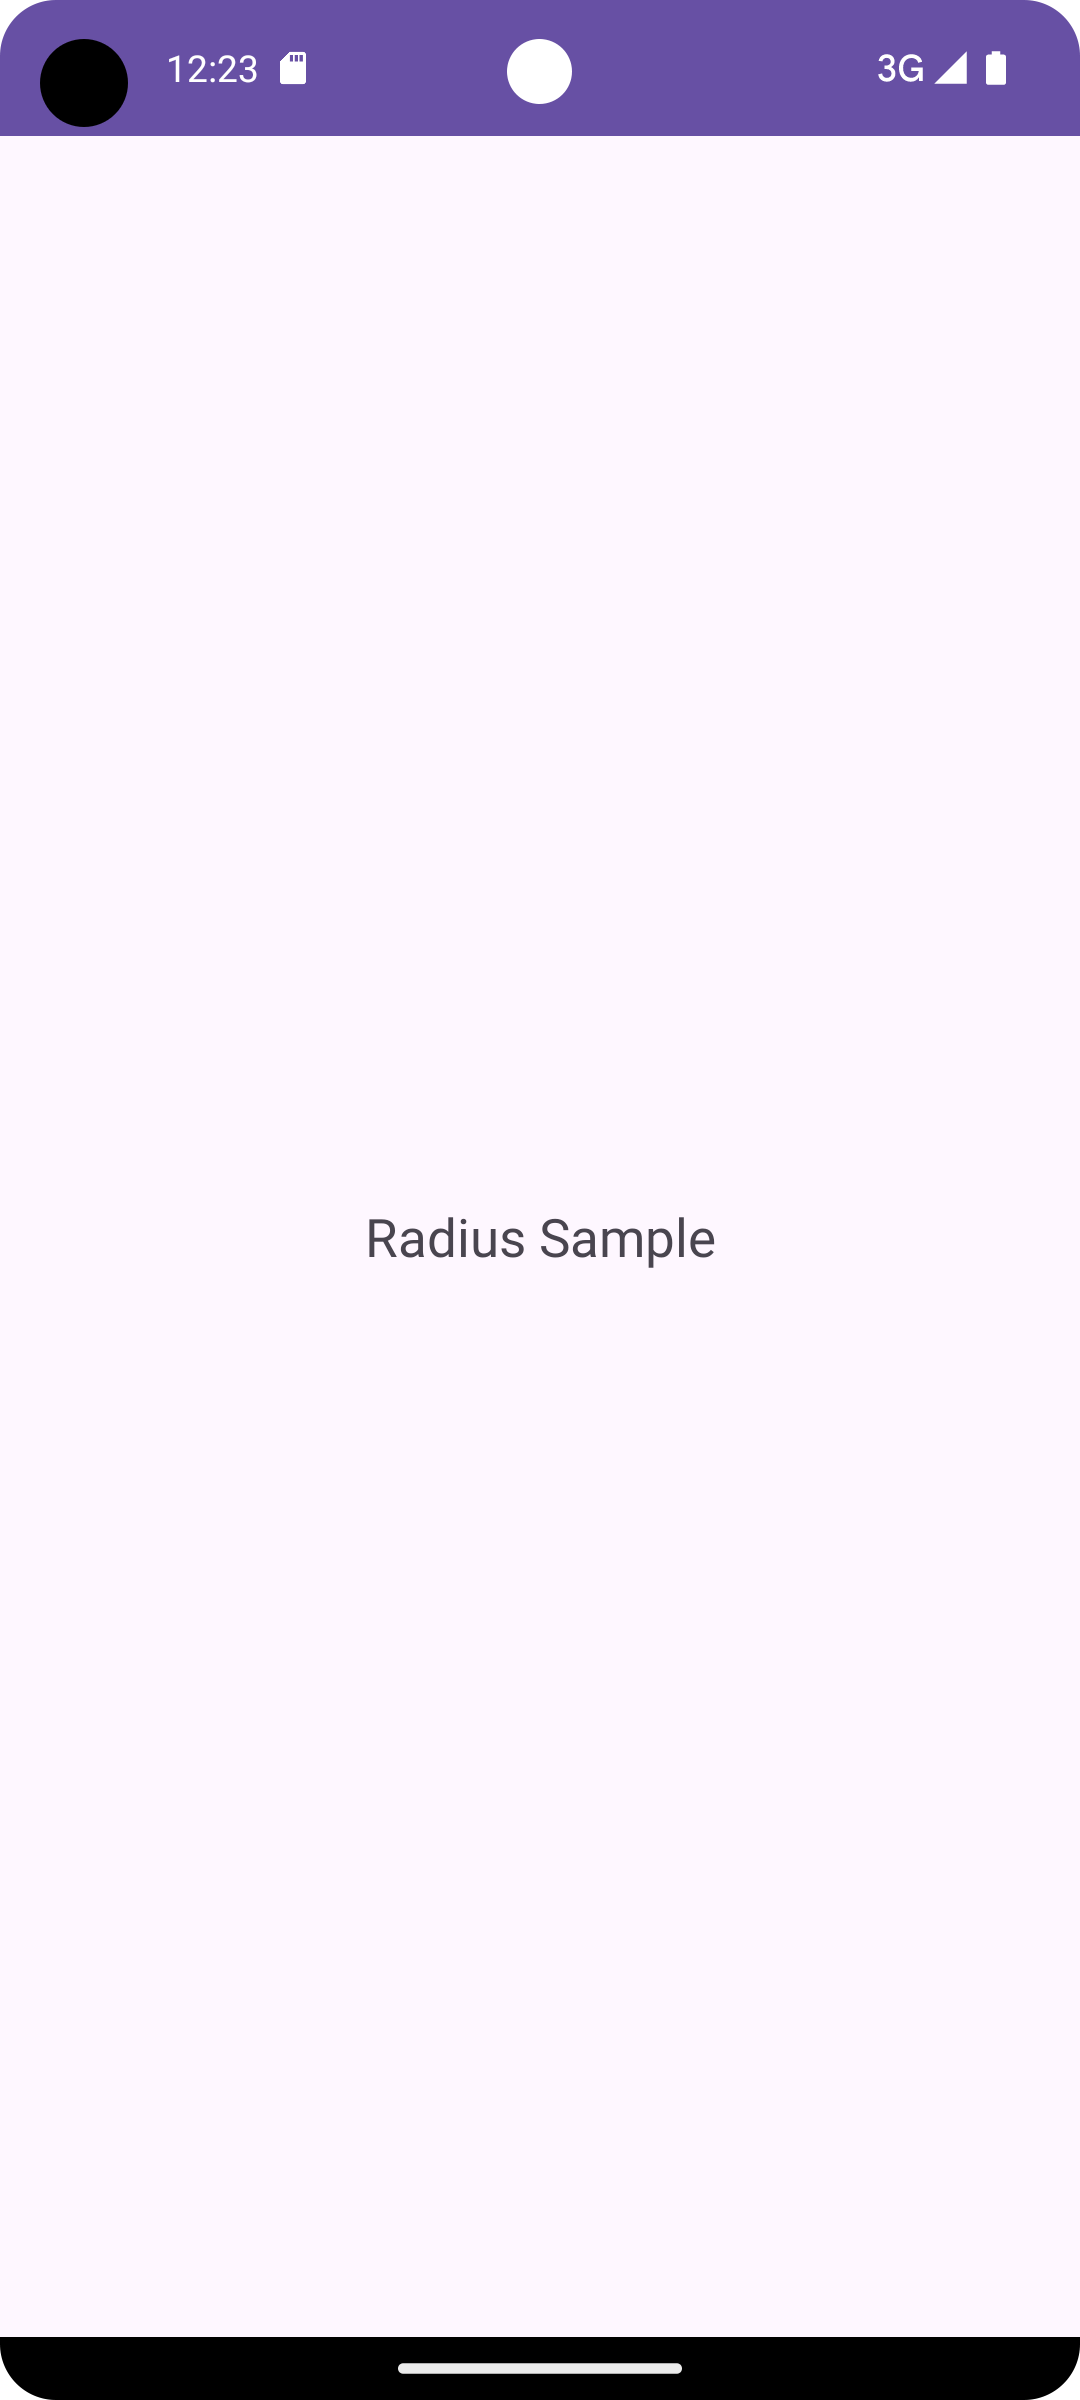
Radius 코드 적용 전 / 후


변경 전 코드는 background와 padding을 제거했고 나머지 코드는 똑같습니다!
관련 속성은 아래링크를 참고하세요!
https://developer.android.com/guide/topics/resources/drawable-resource?hl=ko#Shape
드로어블 리소스 | Android 개발자 | Android Developers
이 페이지는 Cloud Translation API를 통해 번역되었습니다. 드로어블 리소스 컬렉션을 사용해 정리하기 내 환경설정을 기준으로 콘텐츠를 저장하고 분류하세요. 드로어블 리소스는 화면에 그릴 수
developer.android.com
'Android Studio > - Programming' 카테고리의 다른 글
| [코틀린/OOP] OOP (객체지향 프로그래밍) 란 무엇인가? (0) | 2024.03.25 |
|---|---|
| [코틀린] Abstract class와 Interface 차이점 (0) | 2024.03.19 |
| [안드로이드/StatusBar] 앱 상태바 색상 변경하는 방법 (0) | 2024.03.04 |
| [안드로이드/ButtonColor] 버튼 색상 변경하는 방법 (0) | 2024.03.01 |
| [코틀린/변수] var과 val의 차이를 알아보자 (1) | 2024.02.20 |

주코딩의 개발 노트!
포스팅이 좋았다면 "좋아요❤️" 또는 "구독👍🏻" 해주세요!
![[코틀린/OOP] OOP (객체지향 프로그래밍) 란 무엇인가?](https://img1.daumcdn.net/thumb/R750x0/?scode=mtistory2&fname=https%3A%2F%2Fblog.kakaocdn.net%2Fdna%2FbG12xd%2FbtsF583Zxrl%2FAAAAAAAAAAAAAAAAAAAAAIyonDwDTpP4uvEHUBGzXzVdrXKEjUtYPyXVTe-m90pP%2Fimg.png%3Fcredential%3DyqXZFxpELC7KVnFOS48ylbz2pIh7yKj8%26expires%3D1764514799%26allow_ip%3D%26allow_referer%3D%26signature%3DtUbVxja1x1MCCGwGy8BZF6vZysU%253D)
![[코틀린] Abstract class와 Interface 차이점](https://img1.daumcdn.net/thumb/R750x0/?scode=mtistory2&fname=https%3A%2F%2Fblog.kakaocdn.net%2Fdna%2Fm4FuN%2FbtsFUpFQhj1%2FAAAAAAAAAAAAAAAAAAAAAP9AvQ1pNEmWg4t7iyvhBxnI8BTszKDJSai7zyxHSBIB%2Fimg.png%3Fcredential%3DyqXZFxpELC7KVnFOS48ylbz2pIh7yKj8%26expires%3D1764514799%26allow_ip%3D%26allow_referer%3D%26signature%3DpQp6nsqzHT2ipN0JajEF6mm3R6Q%253D)
![[안드로이드/StatusBar] 앱 상태바 색상 변경하는 방법](https://img1.daumcdn.net/thumb/R750x0/?scode=mtistory2&fname=https%3A%2F%2Fblog.kakaocdn.net%2Fdna%2FcZp8A3%2FbtsFoJZDq6J%2FAAAAAAAAAAAAAAAAAAAAAGXpFePIRnY-aKV4WfrEJEvgihRogFMCKG0u4WXpZ7MR%2Fimg.png%3Fcredential%3DyqXZFxpELC7KVnFOS48ylbz2pIh7yKj8%26expires%3D1764514799%26allow_ip%3D%26allow_referer%3D%26signature%3DOGoXGgzIcUHKx47kWBm0eiisvaw%253D)
![[안드로이드/ButtonColor] 버튼 색상 변경하는 방법](https://img1.daumcdn.net/thumb/R750x0/?scode=mtistory2&fname=https%3A%2F%2Fblog.kakaocdn.net%2Fdna%2F2Q7wi%2FbtsFml5jSgu%2FAAAAAAAAAAAAAAAAAAAAAIdJ-ltebfurB_uzhuUCTT_bR01B7AJqXRoQZ0mO4jz1%2Fimg.png%3Fcredential%3DyqXZFxpELC7KVnFOS48ylbz2pIh7yKj8%26expires%3D1764514799%26allow_ip%3D%26allow_referer%3D%26signature%3DC6RMLXyCv5l57AvA9Lc27Mcq49o%253D)